To effectively make tire lubricant, focus on simple DIY solutions using common household items like dish soap and water for temporary needs, or explore specialized silicone-based sprays for long-term tire mounting. This guide simplifies the process for quick fixes.
Key Takeaways
- Understand DIY vs. commercial tire lubricant.
- Learn the simple dish soap and water method.
- Discover silicone spray as a professional option.
- Prioritize safety and proper application.
- Avoid petroleum-based products on tires.
- Identify when to seek professional help.
How to Make Tire Lubricant: A Quick Fix Awaits
Struggling with a stubborn tire? Whether you’re changing a flat or remounting a tire on its rim, a good lubricant makes a world of difference. It eases the process, prevents damage, and ensures a proper seal. But what if you’re in a pinch and don’t have specialized tire mounting paste? Many people wonder how to make tire lubricant for those moments. It’s a common question because the right lubrication is crucial, yet sometimes overlooked. This guide breaks down simple, effective ways to create or use tire lubricant, ensuring you can tackle tire tasks with confidence and prevent costly mistakes. Let’s explore some quick fixes and best practices to get your tires on and off smoothly.
Understanding Tire Lubricants: Why They Matter
Tire lubricants are more than just slippery substances; they are essential tools for tire maintenance and installation. Their primary role is to reduce friction between the tire bead and the wheel rim. This lubrication is critical for a few key reasons.
Reducing Friction During Mounting and Dismounting
When you try to force a tire onto a rim or remove a stuck one without proper lubrication, you risk damaging both the tire bead and the wheel. The rubber bead, which seals against the rim, can be scuffed, torn, or even stretched out of shape. This damage can lead to slow leaks, improper seating, and ultimately, tire failure. A good lubricant allows the tire bead to slide into place smoothly.
Ensuring a Proper Seal
For tubeless tires, the seal between the tire bead and the wheel rim is what holds air. If the bead is dry or damaged, it might not create a perfect seal, leading to a slow leak. Tire lubricants help ensure the bead seats correctly and forms an airtight barrier.
Protecting Tire and Wheel Materials
Specialized tire lubricants are formulated to be safe for rubber, metal, and even some plastic components found in wheels. They won’t degrade the rubber or corrode the metal, which is vital for the longevity of your tires and wheels. This is where understanding the types of lubricants becomes important.
DIY Tire Lubricant vs. Commercial Options
When you need to lubricate a tire, you’ll encounter two main categories: do-it-yourself (DIY) solutions and commercially manufactured products. Each has its advantages and specific use cases.
The Quick Fix: Simple DIY Tire Lubricant
For occasional, less demanding tasks like changing an inner tube or fitting a tire that isn’t particularly tight, a simple DIY lubricant can often suffice. The most common and accessible option is a mixture of mild dish soap and water.
How to Make a Dish Soap and Water Lubricant
This method is straightforward and uses readily available household items. It’s perfect for emergency situations or when you’re just getting started with basic tire maintenance.
Ingredients:
- Mild liquid dish soap (avoid harsh detergents or abrasive cleaners)
- Water
Tools:
- Bucket or container
- Sponge, cloth, or brush for application
Instructions:
- Fill a bucket with water. A ratio of about 1 part dish soap to 5-10 parts water is a good starting point. You want a soapy solution that lathers lightly but isn’t overly foamy.
- Stir the mixture well to ensure the soap is evenly distributed.
- Dip your sponge, cloth, or brush into the soapy water.
- Apply the soapy water generously to the tire bead and the edge of the wheel rim where the tire will sit. Ensure both surfaces are well-coated.
Pros of DIY Dish Soap Lubricant:
- Readily Available: Ingredients are common in most households.
- Inexpensive: Costs very little to make.
- Temporary Solution: Works well for light-duty tasks.
Cons of DIY Dish Soap Lubricant:
- Not Long-Lasting: Dries out relatively quickly, especially in warm conditions.
- Potential Residue: May leave a slight residue that could attract dirt over time.
- Less Effective on Tight Fits: May not provide enough slip for very stiff tire beads or complex wheel designs.
- Potential for Corrosion (if not rinsed): If left to dry and not cleaned off, some soaps can potentially cause minor corrosion on certain wheel finishes over extended periods, though this is rare with mild dish soap.
When to Use: Ideal for bicycle tires, some smaller vehicle tires, or when no other option is available. It’s a great go-to for quick repairs where the tire won’t be left on the rim for an extended period without further use.
Commercial Tire Lubricants: The Professional Choice
For serious automotive work, professional mechanics, or situations where a reliable, durable lubrication is needed, commercial tire lubricants are the way to go. These products are specifically formulated for the demands of tire mounting and are generally safer and more effective long-term.
Types of Commercial Tire Lubricants
Commercial lubricants fall into a few main categories, each with its own benefits:
| Lubricant Type | Key Ingredients | Pros | Cons | Best For |
|---|---|---|---|---|
| Silicone-Based Lubricants (Sprays/Pastes) | Silicone oil, propellants (for sprays) | Excellent slip, safe for rubber & most wheel materials, long-lasting, won’t dry out quickly, prevents bead damage. | Can be slightly more expensive than DIY, some types may require specific application tools. | Professional tire mounting, tubeless tires, high-performance wheels, preventing leaks. |
| Water-Based Tire Mounting Pastes | Glycerin, other polymers, water | Superior slip and adherence, creates a reliable seal, prevents sticking, biodegradable options available. | Can be messier to apply, might require scraping off old paste before re-lubricating. | Heavy-duty commercial tires, difficult tire fits, ensuring a perfect seal on all tire types. |
| Worm Lube / Bead Lubricants | Often proprietary water-based formulas, sometimes with added anti-corrosion agents. | Specifically designed for tire bead lubrication, good slip, prevents seizing of tire bead to rim. | Less common for general DIY use, typically found in professional auto shops. | Automotive tire shops, heavy-duty tire services. |
When choosing a commercial lubricant, look for products labeled as “Tire Mounting Lube,” “Bead Lubricant,” or “Tire Sealant.” Always check the product’s safety data sheet (SDS) if you have concerns about compatibility with your specific tire or wheel materials.
Why Avoid Petroleum-Based Products?
It’s crucial to understand that petroleum-based lubricants, such as WD-40, motor oil, or grease, should almost never be used on tires. These products can degrade rubber over time, leading to premature cracking and failure of the tire bead. For expert advice on what to avoid, resources like those from the National Highway Traffic Safety Administration (NHTSA) often highlight best practices for vehicle maintenance, including tire safety.
Step-by-Step Guide: Applying Tire Lubricant
Whether you’re using a DIY solution or a commercial product, the application process is similar. Proper application is key to achieving the desired results without damaging your tires or wheels.
Step 1: Prepare the Tire and Wheel
Before applying any lubricant, ensure both the tire bead and the wheel rim are clean. Remove any dirt, debris, or old lubricant. If you’re mounting a tire, make sure the wheel is free of rust or corrosion that could hinder the seal.
Step 2: Gather Your Lubricant and Tools
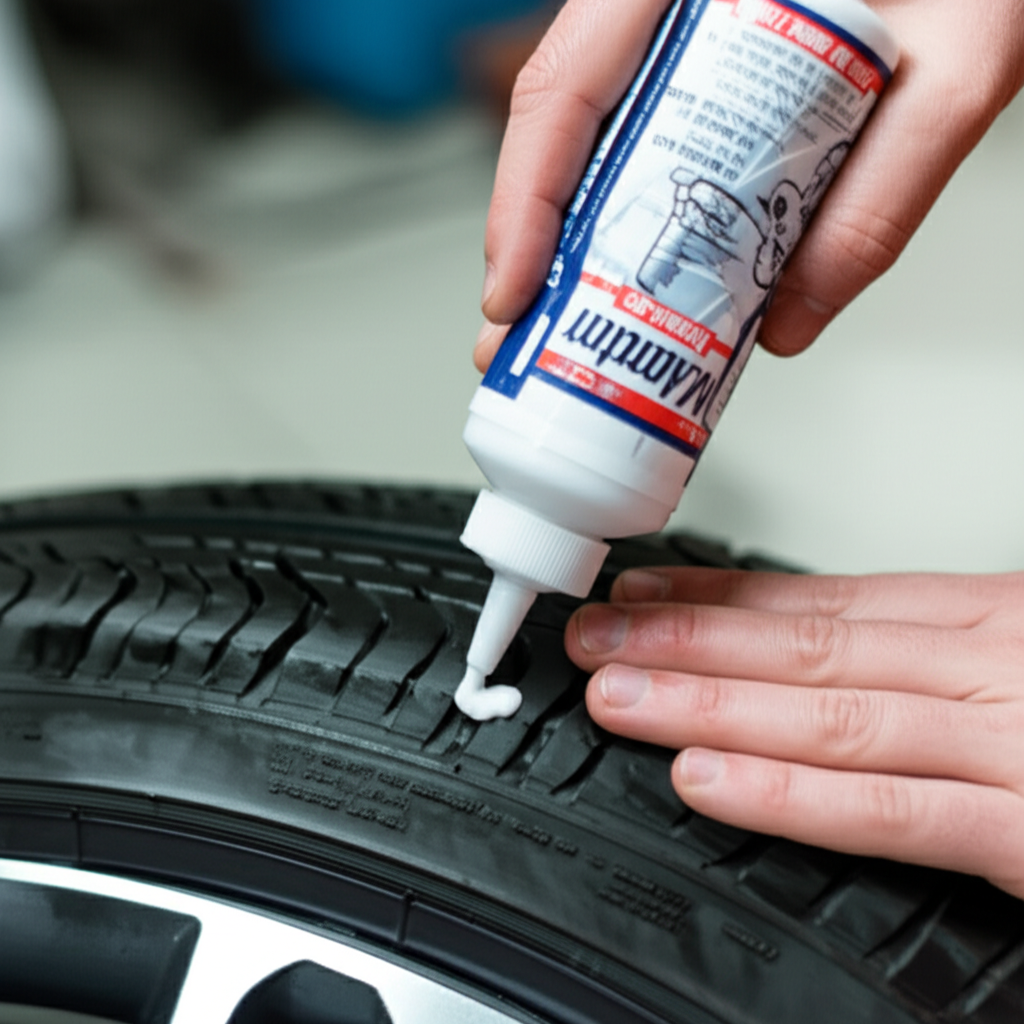
Have your chosen lubricant (DIY or commercial) and application tool (brush, sponge, or applicator pad) ready. For commercial products, follow the manufacturer’s instructions for application, as some come in aerosol cans, others in tubs or bottles.
Step 3: Apply Lubricant to the Tire Bead
Apply a liberal amount of lubricant to the entire circumference of both edges (beads) of the tire. This ensures smooth entry and proper seating during mounting. For dismounting, applying to the bead where it meets the rim can help break the seal.
Step 4: Apply Lubricant to the Wheel Rim
Next, apply lubricant to the outer edge of the wheel rim, specifically the area where the tire bead will make contact. This is particularly important for tubeless tires to ensure a perfect seal. Pay attention to the drop center of the rim as well, as this area needs to be lubricated to allow the bead to move freely.
Step 5: Mount or Dismount the Tire
For Mounting: Carefully place the tire onto the rim. The lubricant should allow the bead to slide into place with significantly less force. You may still need tire levers for the final section, but the lubricant will make it much easier and safer. Work your way around the tire, ensuring the bead is seated evenly. If using a compressor to seat the bead, ensure the area is well-lubricated for an immediate seal.
For Dismounting: If you’re removing a tire, the lubricant can help break the seal. Apply it generously around the bead and rim. Use tire levers carefully, ensuring the lubricant allows them to slide without tearing the rubber.
Step 6: Clean Up (if necessary)
After the tire is mounted or dismounted, wipe away any excess lubricant from the outside of the tire and wheel. This prevents dirt attraction and maintains a clean appearance. For DIY dish soap lubricants, a quick rinse with plain water can prevent residue buildup.
External Link: For a deeper understanding of tire mounting tools and techniques, consult resources from reputable automotive suppliers or educational sites like those from vocational training institutions. For instance, understanding the mechanics behind tire changers can inform your lubrication approach.
Pro Tips for Tire Lubrication Success
As a lubrication expert, I’ve learned a few tricks that can save you time and frustration. These small details can make a big difference in achieving a professional-quality result.
Pro Tip: Always ensure your lubricant is compatible with your tire and wheel materials. If you’re unsure, opt for a known safe product like a high-quality silicone-based tire mounting spray. For maximum sealing power on tubeless tires, focus on applying lubricant to both the tire bead and the entire bead seat area of the rim, including the drop center.
Common Pitfalls and How to Avoid Them
Even with the right lubricant, mistakes can happen. Here are some common issues and how to sidestep:
Problem: Tire Bead Won’t Seat Properly
Cause: Insufficient lubricant, debris on the bead or rim, or a damaged tire bead/rim.
Solution: Ensure liberal application of lubricant. Clean both the bead and rim thoroughly. If the problem persists, inspect the tire and rim for visible damage.
Problem: Tire Leaks Air After Mounting
Cause: Uneven bead seating, damaged bead, or foreign objects caught between the bead and rim.
Solution: Re-lubricate liberally and ensure the bead is fully seated all the way around. Deflate the tire slightly, push the bead into the drop center of the rim, and reinflate. If a leak persists, the tire may be damaged and require replacement.
Problem: Damaging the Tire Bead
Cause: Using excessive force, incorrect tire levers, or attempting to mount/dismount without adequate lubrication.
Solution: Always use plenty of lubricant. Employ tire levers correctly, ensuring they grip the bead without pinching or tearing. Work slowly and deliberately.
Problem: Using the Wrong Lubricant
Cause: Mistaking general-purpose lubricants (like WD-40) for tire lubricants.
Solution: Stick to products specifically designed for tire mounting or use the simple dish soap and water mix for temporary needs. Never use petroleum-based products on rubber.
When to Call a Professional
While this guide covers DIY and basic commercial lubricant applications, there are times when professional help is best. If you’re dealing with:
- Run-flat tires, which have very stiff sidewalls and beads.
- Low-profile tires that are notoriously difficult to mount.
- Expensive or delicate alloy wheels that you don’t want to risk scratching.
- A persistent problem with sealing or mounting.
A professional tire shop has specialized tools and expertise to handle these situations safely and efficiently. They also have access to a wide range of professional-grade lubricants.
Frequently Asked Questions (FAQ)
Q1: Can I use cooking oil or vegetable oil as tire lubricant?
A: It’s not recommended. While they may offer some initial slip, cooking oils can degrade rubber over time and leave sticky residues that attract dirt. Stick to dish soap and water or specialized products.
Q2: How much lubricant should I use?
A: Generously! You want a visible coating on both the tire bead and the wheel rim. It’s better to use a little too much lubricant than not enough, as it significantly eases the process and protects the components.
Q3: Does the brand of dish soap matter for DIY lubricant?
A: It’s best to use a mild, pH-neutral dish soap. Avoid harsh degreasers or soaps with added harsh chemicals, as they could potentially affect the rubber or wheel finish over time.
Q4: Can I use tire shine products as lubricant?
A: No. Tire shine products are designed for cosmetic appearance and may contain silicones or other solvents that are not formulated for the stress of tire mounting and could even damage the rubber.
Q5: How long does a DIY dish soap lubricant last on the tire?
A: It’s a temporary solution. The water evaporates, and the soap residue can dry out, losing its lubricating properties relatively quickly, usually within a few hours depending on ambient temperature and humidity.
Q6: Are silicone-based tire lubricants safe for all types of wheels?
A: Generally, yes. High-quality silicone-based tire lubricants are formulated to be safe for most common wheel materials, including steel, aluminum, and painted or clear-coated alloys. However, always check the product label or manufacturer’s recommendations if you have concerns about exotic wheel finishes.
Q7: What’s the difference between a tire lubricant and a tire sealant?
A: A tire lubricant (or mounting paste) is used during the installation or removal of a tire to reduce friction. A tire sealant is a liquid product inserted into a tire to automatically seal small punctures while you drive. They serve entirely different purposes.
Conclusion
Mastering how to make and use tire lubricant, whether a simple DIY solution or a professional-grade product, is a valuable skill for any car owner or DIY enthusiast. It’s a proactive step that not only simplifies the often-difficult task of fitting or removing tires but also protects your investment in tires and wheels. By understanding the role of lubrication, choosing the right type of product for your needs, and applying it correctly, you can avoid common frustrations and potential damage. Remember that while a dish soap and water mixture can offer a quick fix in a pinch, investing in a good quality, purpose-made tire lubricant will provide superior results and peace of mind for more demanding applications. Keep these simple steps and tips in mind, and you’ll be well-equipped to tackle your next tire project with confidence.