How To Make Grease Lubricant At Home: Astonishing Results
Quick Summary
Discover how to make grease lubricant at home for astonishing results. This guide simplifies the process, using common ingredients to create effective homemade lubricants for various needs, from household tasks to simple mechanical uses.
Key Takeaways
- Learn simple recipes for homemade grease.
- Understand ingredient basics for lubricant creation.
- Apply homemade grease safely and effectively.
- Identify suitable uses for DIY lubricants.
- Ensure proper storage of your creations.
Have you ever found yourself needing a bit of grease for a squeaky hinge, a sticky drawer, or a bicycle chain, only to realize you’re completely out? It’s a common situation, and the thought of making your own might seem daunting. But what if I told you that with a few kitchen staples, you could whip up a surprisingly effective grease lubricant right in your own home? This guide is here to demystify the process, offering clear, step-by-step instructions. We’ll explore simple recipes that deliver astonishing results, empowering you to tackle minor lubrication needs with confidence. Let’s dive into the world of DIY lubricants and unlock their potential.
Understanding Lubricants: More Than Just Slippery Stuff
Before we start mixing, it’s important to understand what a lubricant actually does. At its core, a lubricant reduces friction between two surfaces that are moving relative to each other. Think of it as a protective barrier. When surfaces rub together without lubrication, they create heat and wear. Lubricants prevent this by creating a film that allows the surfaces to glide smoothly. This is crucial for everything from the tiny gears in your watch to the massive components in industrial machinery.
There are many types of lubricants, but grease and oil are the most common for home and workshop use. Oil is typically a liquid and is often used where continuous lubrication and cooling are needed, like in an engine or a spinning bearing. Grease, on the other hand, is usually a semi-solid or solid substance. It’s made by combining a base oil with a thickening agent, like soap or clay. This makes grease stickier and less prone to dripping away, making it ideal for applications where you need lubrication to stay in place, such as on a bolt, a joint, or a slow-moving part.
The science behind lubricants involves understanding viscosity (how thick or thin a fluid is), film strength (how well it resists breaking under pressure), and extreme pressure (EP) additives. For our DIY purposes, we’ll focus on creating a simple grease that provides basic lubrication and reduces common friction. While homemade versions won’t match the performance of specialized commercial lubricants designed for extreme temperatures or heavy loads, they can be incredibly useful for everyday tasks.
Why Make Grease Lubricant At Home?

You might wonder why you’d go through the effort of making grease at home when you can easily buy it. There are several compelling reasons:
- Cost-Effectiveness: Many common household items can be repurposed, making DIY grease significantly cheaper than buying specialized lubricants.
- Availability: When you need a dab of grease in a pinch, you might not have any readily available. Making it yourself means you can create it as needed.
- Ingredient Control: You know exactly what’s going into your DIY lubricant, which can be important if you have sensitivities or specific needs.
- Environmental Friendliness: Repurposing items reduces waste, and some homemade recipes use natural ingredients.
- Learning and Satisfaction: There’s a unique satisfaction that comes from creating something useful with your own hands. It’s a great way to understand basic chemistry and mechanics.
While DIY grease is fantastic for many light-duty applications, it’s crucial to remember its limitations. For high-performance automotive parts, industrial machinery, or conditions involving extreme heat or pressure, professional-grade lubricants are essential. Always consult the manufacturer’s recommendations for your specific equipment.
Essential Ingredients for Homemade Grease
The foundation of most greases, whether commercial or homemade, consists of a base oil and a thickening agent. For simple DIY recipes, we’ll focus on ingredients you likely already have or can easily find.
Base Oils: The Slippery Foundation
The base oil provides the actual lubricating properties. It’s the liquid that reduces friction. For home use, common and effective base oils include:
- Vegetable Oils (e.g., Olive Oil, Canola Oil): These are readily available, non-toxic, and biodegradable. However, they can go rancid over time and are not suited for high-temperature applications.
- Mineral Oil (e.g., Baby Oil): This is a refined petroleum product. It’s stable, odorless, and has a longer shelf life than vegetable oils. It’s a good all-around choice for general lubrication.
- Petroleum Jelly (Vaseline): While technically a semi-solid, petroleum jelly is an excellent base for simple greases. It’s a petroleum distillate and is very stable.
Thickening Agents: Giving Grease its Body
The thickening agent is what turns a liquid oil into a semi-solid grease. It traps the oil and gives the grease its consistency. For DIY recipes, common thickeners are:
- Soap Flakes or Grated Bar Soap: Traditional soap, especially those made with animal fats (like lye soap), can react with oils to create a gel-like consistency.
- Starch (e.g., Cornstarch, Flour): While not a true thickener in the chemical sense like soap, starch can absorb oil and create a paste that offers some lubrication. This is often temporary and can break down easily.
- Waxes (e.g., Beeswax, Paraffin Wax): Melting wax into oil can create a thicker, more stable grease, especially useful for waterproofing and protecting surfaces.
- Lithium Grease Base (for Advanced DIY and specific repairs): If you’re looking for something closer to commercial grease for more demanding applications (like bike parts or certain automotive joints), you can use a pre-made lithium grease base (often sold as a tub of thick, white lubricant) and mix it with a compatible oil to adjust consistency. This is typically for experienced users and requires careful handling to avoid contaminating the base grease.
It’s important to note that mixing different types of oils and thickeners can lead to unpredictable results. For beginners, sticking to one type of oil and one thickener per recipe is best.
Simple Grease Lubricant Recipes for Home Use
Here are a few beginner-friendly recipes. Remember to always test your homemade grease on a small, inconspicuous area first to ensure it’s suitable for your specific application.
Recipe 1: The All-Purpose Kitchen Grease (Vegetable Oil & Starch)
This is the simplest and quickest recipe, perfect for lubricating squeaky cabinet hinges, sticky drawers, or garden tools. It’s non-toxic but has a limited lifespan and isn’t for heavy-duty use.
Ingredients:
- 1/2 cup vegetable oil (olive, canola, or sunflower)
- 2-3 tablespoons cornstarch or all-purpose flour
Tools:
- Small bowl
- Spoon or whisk for mixing
- Airtight container for storage
Instructions:
- Pour the vegetable oil into the small bowl.
- Gradually add the cornstarch or flour, whisking or stirring continuously.
- Start with 2 tablespoons and add more, a teaspoon at a time, until you achieve a thick, paste-like consistency. You want it thick enough to hold its shape but still spreadable.
- Mix thoroughly to ensure there are no lumps.
- Transfer the mixture to an airtight container.
Applications:
Great for lubricating wooden drawer slides, garden tools, or as a temporary fix for squeaky door hinges. Avoid using on rubber components as vegetable oil can degrade some types of rubber over time. It’s also not suited for high-heat or high-pressure scenarios.
Recipe 2: The Stable Household Grease (Petroleum Jelly & Mineral Oil)
This recipe creates a more stable and longer-lasting grease, similar to petroleum jelly itself but potentially with a different consistency. It’s excellent for lubricating hinges, locks, bicycles, and general household mechanical parts.
Ingredients:
- 1/2 cup petroleum jelly (Vaseline)
- 2-4 tablespoons mineral oil (baby oil)
Tools:
- Double boiler setup (or a heat-safe bowl over a pot of simmering water)
- Stirring utensil (non-plastic if heating)
- Airtight container for storage
Instructions:
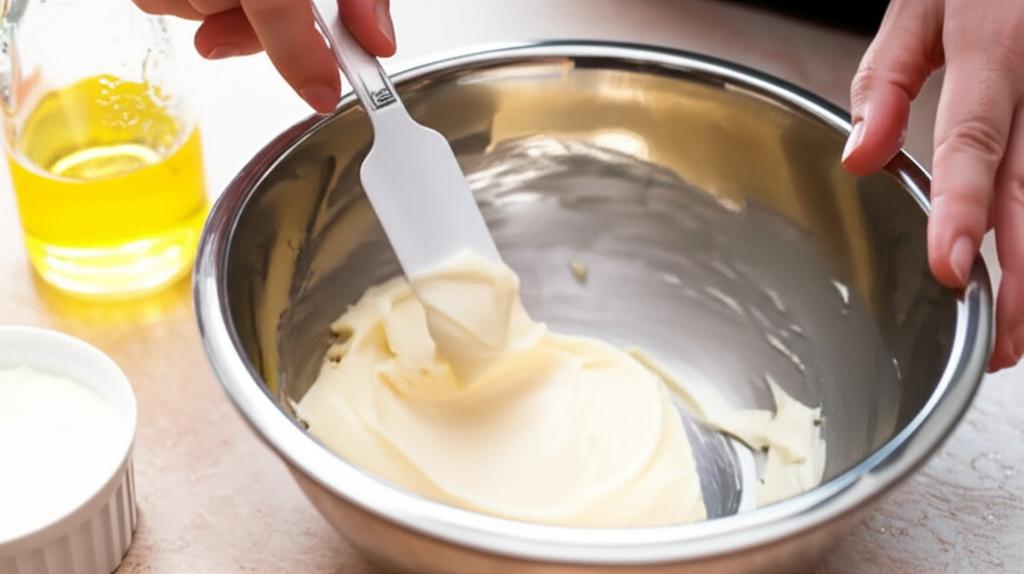
- Gently heat the petroleum jelly in the top of the double boiler until it is soft and pliable, but not fully melted. You want it to be easily stirrable.
- Slowly add the mineral oil, one tablespoon at a time, while stirring constantly.
- Continue stirring until the oil is fully incorporated and you reach your desired consistency. The more mineral oil you add, the softer the grease will be. Aim for a thick, smooth consistency.
- Once mixed, remove from heat and let it cool completely before transferring to an airtight container.
Applications:
This is a versatile grease for most common household mechanical needs. It works well on metal-to-metal contact points like hinges, latches, bicycle chains (wipe off excess), and even for lubricating fishing reels. It’s more stable than vegetable oil-based greases and less likely to go rancid.
Recipe 3: The Waterproofing Wax Grease (Beeswax & Oil)
This type of grease offers excellent water resistance and protection, making it ideal for outdoor equipment, leather conditioning (in small amounts and tested first), or protecting metal parts from rust.
Ingredients:
- 1/4 cup beeswax pellets or grated beeswax
- 1/2 cup base oil (mineral oil or a light vegetable oil like sunflower)
Tools:
- Double boiler setup (or a heat-safe bowl over a pot of simmering water)
- Stirring utensil
- Airtight container for storage
Instructions:
- Combine the beeswax and base oil in the top of the double boiler.
- Heat gently, stirring occasionally, until the beeswax is completely melted and the mixture is clear.
- Remove from heat. If you want a thicker grease, you can gradually add a little more beeswax. If you want it softer, add a touch more oil.
- Stir well to ensure everything is homogenous.
- Allow the mixture to cool and thicken before transferring it to an airtight container. It will solidify into a waxy paste.
Applications:
Excellent for protecting metal from corrosion, lubricating outdoor tools, conditioning leather goods (test first!), and sealing threads on pipes for temporary applications. The beeswax provides a protective barrier against moisture and elements.
A More Advanced Approach: Using Lard (Animal Fat)
Historically, animal fats like lard were common ingredients in homemade lubricants. While less common today due to the availability of petroleum-based products, it’s a viable natural option if you have access to good quality lard.
Recipe 4: Lard-Based Grease
This grease has good lubricating properties but can be sensitive to temperature changes and may have a shorter shelf life than petroleum-based options. Also, the smell of lard might not be desirable for all applications.
Ingredients:
- 1 cup rendered lard (ensure it’s fresh and clean)
- 1/4 cup mineral oil or petroleum jelly (optional, for stability and consistency)
- 1 tablespoon soap flakes (optional, acts as a mild emulsifier)
Tools:
- Double boiler setup
- Stirring utensil
- Airtight container
Instructions:
- Gently melt the lard in the double boiler.
- If using, stir in the soap flakes until dissolved.
- If using mineral oil or petroleum jelly, slowly add it and stir until the mixture is smooth and consistent.
- Remove from heat and let it cool. The consistency will thicken as it cools.
- Store in an airtight container.
Applications:
Suitable for general lubrication of tools, hinges, and non-critical moving parts. It’s a good option if you prefer natural ingredients but be mindful of its stability in varying temperatures.
Pro Tip: Consistency Control
The key to a good homemade grease is achieving the right consistency. Think of it like making gravy or dough. Start with less of your thickening agent (starch, wax, or soap) and add more gradually until you reach your desired thickness. For greases involving heat, like the beeswax or petroleum jelly recipes, remember that the mixture will be much thinner when hot and will thicken considerably as it cools. Always let your mixture cool completely before judging its final consistency and making adjustments.
Table: Comparing Homemade Grease Recipes
Here’s a quick comparison to help you choose the right recipe for your needs:
| Recipe Name | Main Ingredients | Best For | Pros | Cons |
|---|---|---|---|---|
| Kitchen Grease | Vegetable Oil, Starch/Flour | Light household tasks (hinges, drawers) | Non-toxic, readily available ingredients, quick to make | Short shelf life, can go rancid, not for heat/pressure |
| Household Grease | Petroleum Jelly, Mineral Oil | General lubrication (hinges, locks, bikes) | Stable, longer shelf life, versatile | Requires gentle heating, petroleum-based |
| Waterproofing Wax Grease | Beeswax, Oil | Rust prevention, outdoor gear, leather | Excellent water resistance, protective barrier | Can be waxy, requires heating |
| Lard-Based Grease | Lard, (optional: mineral oil, soap flakes) | General tools, natural applications | Natural ingredient, good lubrication | Sensitive to temperature, potential smell, shorter shelf life |
Important Safety and Usage Guidelines
Working with lubricants, even homemade ones, requires attention to safety. Here are some key points to keep in mind:
- Patch Test: Always test your homemade grease on a small, hidden area first. Some ingredients can stain or react with certain materials (plastics, rubber, painted surfaces).
- Ventilation: If you are heating ingredients, ensure you are in a well-ventilated area, especially when working with waxes or petroleum products.
- Cleanliness: Use clean tools and containers. Contamination can affect the performance and shelf life of your lubricant.
- Storage: Store your homemade greases in clean, airtight containers. Label them clearly with the ingredients and date of creation. Keep them away from direct sunlight and extreme temperatures.
- Application: Use a clean brush, cloth, or applicator to apply the grease. A little goes a long way. For sensitive mechanisms like bicycle chains or delicate locks, wipe off any excess to prevent dust and dirt buildup.
- Avoid Certain Materials: Be cautious about using homemade greases on rubber seals or O-rings, as some oils (especially vegetable oils) can degrade them. Petroleum jelly and mineral oil are generally safer for rubber, but always test.
- Food Safety: If you are lubricating items that come into contact with food (e.g., hinges on a bread box), only use food-grade ingredients like food-grade mineral oil and beeswax. For most kitchen applications where non-toxicity is paramount, the vegetable oil and starch recipe is the safest bet.
Referencing reliable sources for lubricant recommendations is always a good idea. For instance, the U.S. Fish and Wildlife Service provides basic lubrication principles that can inform your understanding of why different lubricants are used.
When to Choose Commercial Lubricants
While homemade greases are great for many tasks, there are specific situations where you absolutely need to use a commercial lubricant:
- High Temperatures: Homemade greases, especially those with vegetable oils or lard, break down quickly at high temperatures.
- Extreme Pressure: Components under heavy loads require specialized greases with extreme pressure (EP) additives that DIY versions cannot replicate.
- Low Temperatures: Some homemade greases can solidify or lose their lubricating properties in very cold conditions.
- Specialized Equipment: Automotive engines, transmissions, hydraulic systems, and high-performance machinery demand lubricants formulated to precise specifications. Using the wrong lubricant can cause severe damage. For example, the U.S. Department of Energy explains the importance of specific oil grades for vehicle engines.
- Long-Term Use: Commercial lubricants are formulated for stability and longevity, ensuring consistent performance over time.
Always refer to your device’s or machine’s manual for the recommended type of lubricant. For example, if you’re working on a car, follow the manufacturer’s guide on oil and grease specifications. Similarly, for bicycles, specific bike chain lubes or bike-specific greases are best.
Frequently Asked Questions (FAQs)
Can I use cooking oil as a lubricant?
Yes, you can use cooking oil (like olive or canola oil) for very light-duty, temporary lubrication of things like squeaky hinges or drawer slides. However, cooking oils can go rancid over time, attract dirt, and are not suitable for high-heat or high-pressure applications. For a more stable DIY option, consider using mineral oil or petroleum jelly as a base.
How long does homemade grease last?
The shelf life of homemade grease varies greatly depending on the ingredients. Greases made with vegetable oils will degrade fastest, potentially going rancid within weeks or months. Those made with petroleum jelly, mineral oil, or beeswax will last much longer, often a year or more if stored properly in an airtight container away from heat and light.
Is petroleum jelly a good lubricant on its own?
Petroleum jelly (like Vaseline) is an effective lubricant for many common household uses, such as lubricating hinges, locks, and zippers. It’s stable and non-toxic. However, it’s a semi-solid, and for applications requiring a more fluid or specific consistency, it’s often mixed with a base oil.
Can I make grease for my car at home?
It is strongly advised not to make grease for car components at home. Automotive parts require specialized lubricants formulated for extreme temperatures, pressures, and specific material interactions. Using a homemade grease in a car could lead to serious damage and safety hazards. Always use lubricants recommended by your car manufacturer.
What’s the best homemade grease for squeaky door hinges?
For squeaky door hinges, the Household Grease (Petroleum Jelly & Mineral Oil) recipe is an excellent choice. It’s stable, effective, and easy to apply. The simpler Kitchen Grease (Vegetable Oil & Starch) can also work as a quick fix, but might need reapplication more often.
Will homemade grease harm rubber parts?
Some homemade greases, particularly those made with vegetable oils, can degrade or swell rubber components over time. Petroleum jelly and mineral oil are generally much safer for rubber. If you plan to lubricate anything with rubber seals or O-rings, it’s best to use a lubricant specifically designed for rubber or test your homemade mixture on a small piece of the rubber first. Commercial silicone-based lubricants are often the safest bet for rubber parts.
How do I store homemade grease to make it last longer?
To maximize the shelf life of your homemade grease, store it in a clean, airtight container. Keep the container in a cool, dark place, away from direct sunlight and extreme temperature fluctuations. This helps prevent oxidation, evaporation, and contamination, which are the main causes of degradation.
Conclusion
Making your own grease lubricant at home can be a surprisingly rewarding and practical endeavor. From simple kitchen ingredients to more stable petroleum-based mixtures, you have options for tackling common lubrication needs effectively. Remember that these DIY solutions are best suited for light-duty household tasks, general maintenance, and situations where cost or immediate availability are key factors. Always prioritize safety, test your creations, and know when to rely on specialized commercial lubricants for demanding applications.
By understanding the basic components of grease and following these straightforward recipes, you can confidently create your own lubricants, reduce friction, and extend the life of your everyday items. Happy lubricating!